Thai Curry Chicken & Rice Soup (Gluten & Dairy Free)

Thai Curry Chicken & Rice Soup (Gluten & Dairy Free)

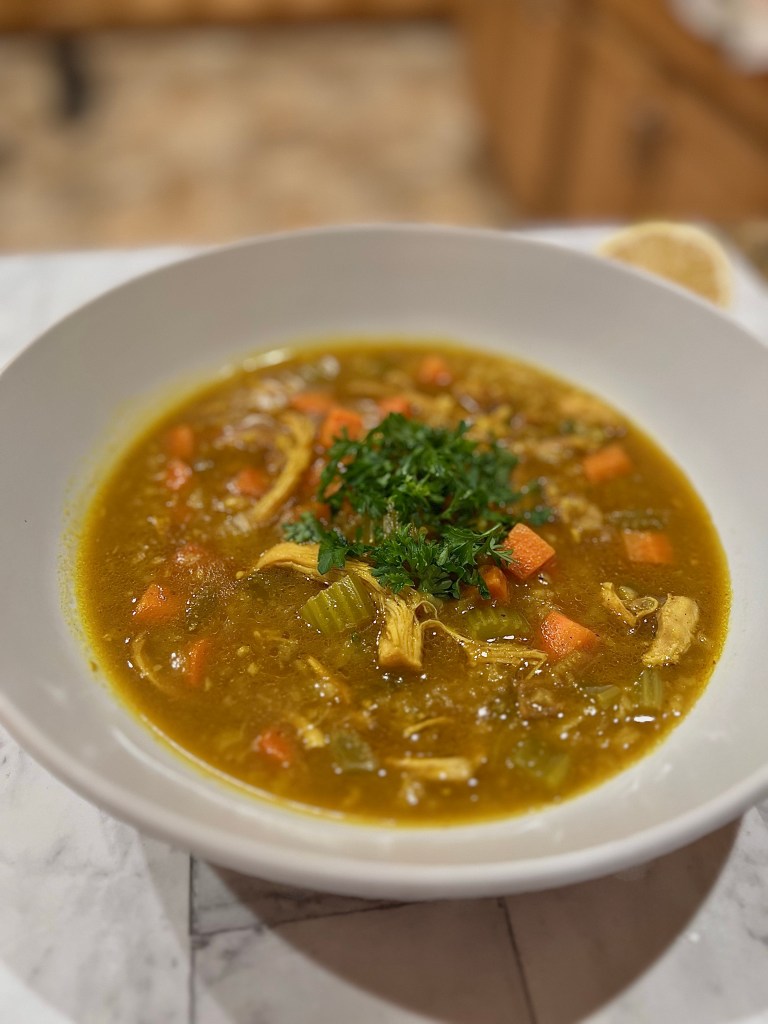
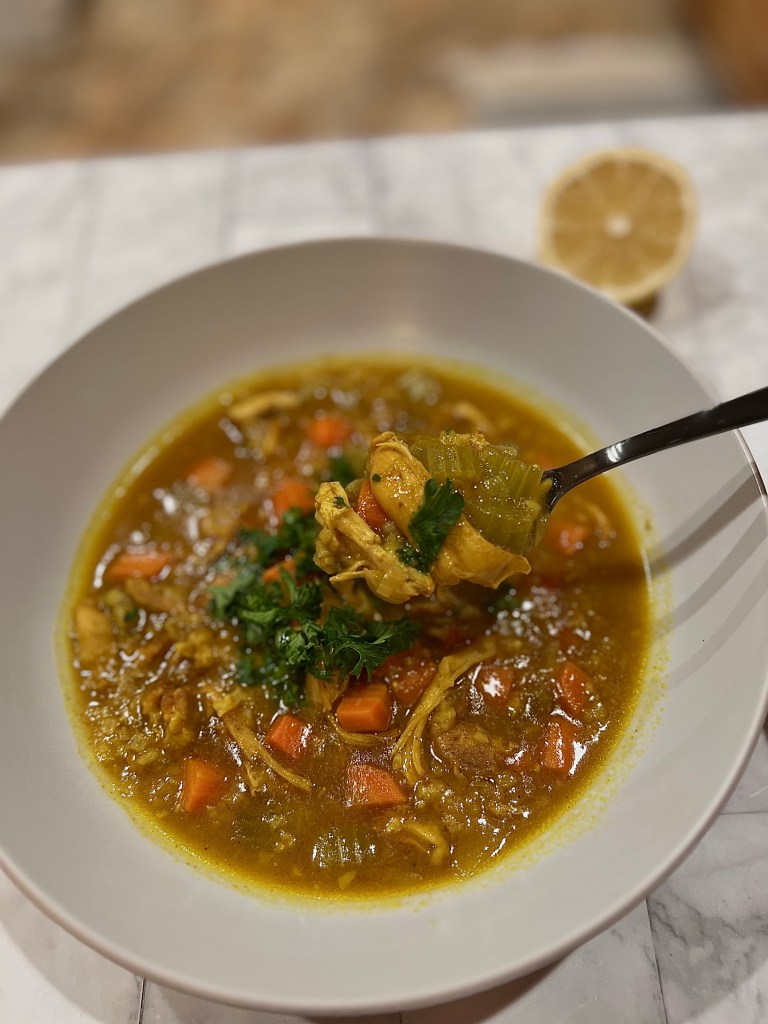
This is hands down now my new favorite soup EVER. It’s so flavorful and cozy. Plus super healthy! It’s perfect for the change in season 🙂

You can use chicken breasts instead of chicken thighs if you prefer – but I think the thighs go perfectly with this soup. 

Watch how to make this recipe, step by step on my Instagram!


SHOP MY AMAZON FOR INGREDIENTS: www.amazon.com/shop/kaylacguerra

Ingredients:

1 pound boneless, skinless chicken thighs

2 tbsp olive oil (to coat pan)

1 tbsp + 1 tsp curry powder, divided

1 tsp turmeric

1 tsp cumin

1 tsp celtic sea salt

1/2 tsp black pepper

1 yellow onion, diced

4 cloves garlic, minced

3 carrots, peeled and diced

3 celery stalks, diced

1/2 cup white rice

1 tbsp coconut aminos

8 cups chicken bone broth

1 tbsp fresh lemon juice

1/4 cup parsley, minced


Step 1

Heat 1 tablespoon of olive oil in a large pot or Dutch oven on medium high heat. Lay your chicken thighs on a plate and pat dry with a paper towel then coat in 1 tablespoon curry powder, turmeric, cumin, salt and pepper.

Step 2

Sear the chicken thighs for 1-2 minutes each side or until crispy (they do not need to be cooked through as they will cook in the soup). Remove from pot and set aside.

Step 3

In the same pot, turn heat to medium and add the additional tablespoon of olive oil. Add the onion, garlic, carrots and celery. Cook until the veggies start to soften, stirring occasionally, for about 5-7 minutes. Stir in the rice, coconut aminos and 1 teaspoon curry powder for another 2 minutes.

Step 4

Pour in the chicken bone broth and bring to a boil over high heat. Add the chicken back in, cover and then simmer for 20-25 minutes.

Step 5

Remove the chicken to shred (I use two forks to pull apart and shred). Then add back in along with the lemon juice.

Step 6

Garnish with fresh parsley on top of each serving bowl and enjoy!

Maple Donut Cookies (Gluten & Dairy Free)

Maple Donut Cookies (Gluten & Dairy Free)

These soft maple donut cookies are everything you love about a real maple glazed donut, without the refined sugar, gluten and dairy. An easy maple glaze makes them so over the top delicious!


SHOP MY AMAZON FOR INGREDIENTS: www.amazon.com/shop/kaylacguerra

Ingredients:

1/4 cup dairy free butter, melted

1/4 cup monkfruit maple syrup (or regular raw maple)

1/4 cup coconut sugar

1 tsp vanilla extract

1/8 tsp maple extract

1 egg, room temp

2 cups blanched almond flour

1/2 tsp baking soda

1/2 tsp celtic sea salt

glaze:

1/2 cup powdered monkfruit sugar

2 tsp dairy free milk (I use oat milk)

1/4 tsp vanilla extract

1 tsp monkfruit maple syrup (or regular raw maple)


Step 1

Preheat your oven to 350° F and line a large baking sheet with parchment paper.

Step 2

In a large bowl, whisk together the melted dairy free butter with the maple syrup, coconut sugar, vanilla, maple extract and egg until smooth. In a separate bowl, combine the almond flour, baking soda, and salt. Stir the dry mixture into the wet until a sticky dough forms.

Step 3

Chill the dough in the refrigerator for 15-20 minutes. Scoop the dough using a medium cookie scoop (about 1.5 Tbsp) onto the prepared baking sheet, about 2” apart.

Step 4

Bake in the preheated oven for 10-12 minutes or until golden brown. Remove from the oven and allow cookies to cool for 10-20 minutes.

Step 5

While the cookies cool, make the glaze. Mix together the remaining ingredients until you get a drizzly consistency. Add just a drop more dairy free milk if the mixture is too thick.

Step 6

Drizzle the glaze over the cooled cookies as desired. Allow the glaze to set for about 20 minutes, then serve. Enjoy! Store leftover cookies loosely covered at room temperature for the first 2 days, or cover and refrigerate for up to a week.

Stuffed Bell Peppers (Gluten & Dairy Free)

Stuffed Bell Peppers (Gluten & Dairy Free)

These Gluten and Dairy Free Stuffed Peppers are super easy to make and packed with all the goodies! Lately I’ve been trying to make simple dinners that are naturally veggie packed, full of proteins and low carb! And these, are exactly that!


SHOP MY AMAZON FOR INGREDIENTS: www.amazon.com/shop/kaylacguerra

Ingredients:

6 bell peppers

olive oil, to coat pan

1 lb grass fed/organic ground beef

1 lb organic ground pork

1/2 yellow onion, diced

4 cloves garlic, minced

1 1/2 cups cooked rice (brown or white)

1/2 package vegan shredded cheddar cheese

(save the rest to sprinkle on top)

4 oz tomato sauce

15 oz can diced tomatoes, drained

1 tablespoon coconut aminos

2 teaspoons italian seasoning

1/2 teaspoon garlic powder

1/4 teaspoon onion powder

1/2 teaspoon salt

1/4 teaspoon black pepper


Step 1

Cut the tops off of the bell peppers, remove the seeds and membrane. Spray a baking dish with avocado oil spray and place the peppers in the dish face up. Drizzle a little olive oil on top of peppers, and sprinkle with salt and pepper. Set aside.

Step 2

Preheat your oven to 375°F. Meanwhile, heat a large skillet over medium heat and add the oil once heated.

Step 3

Sauté the onion for about a minute until soft and fragrant. Add the garlic and sauté another 40 seconds. Add the ground meat and season with all the seasonings above. Cook, breaking up lumps, to brown the meat.

Step 4

Add the tomatoes, tomato sauce, coconut aminos, cooked rice and cheddar cheese. Bring to a simmer.

Step 5

Spoon the meat mixture into the peppers to slightly overfill. Cover with foil and bake for 20 minutes covered.

Step 6

Remove foil, and sprinkle each one with the vegan cheddar shreds (if using). Place back in oven for 10 minutes. I like my peppers to still have some crunch, you might want to bake a couple of minutes longer if you like them softer. Enjoy!

One Pan Enchilada Bake (Gluten & Dairy Free)

One Pan Enchilada Bake (Gluten & Dairy Free)

The easiest, “cheesiest” enchiladas without any of the fuss. Now that’s a meal I can get onboard with weekly!


SHOP MY AMAZON FOR INGREDIENTS: www.amazon.com/shop/kaylacguerra

Ingredients:

Taco Meat, recipe linked here

6-8 gluten free tortillas

1 jar Siete Enchilada Sauce

1 can Siete Vegan Refried Pinto Beans

1 cup Spanish Rice (optional)

1 package vegan shredded cheddar cheese

1/2 package vegan shredded mozzarella cheese

1/3 cup vegan sour cream

Spanish Rice Ingredients:

2 cups chicken bone broth

1 cup gluten free white rice

4-6 tablespoons Mexican Hot Sauce

1/2 cup organic tomato sauce

3 garlic cloves, minced

1/4 yellow onion, chopped

season with salt and pepper

  • To make: sauté garlic, onion and rice on medium heat with a little olive oil until the rice starts to brown (roughly 5 minutes). Add the remaining ingredients and bring to a boil. Once boiling, reduce heat to a simmer and cover with lid for 15-20 minutes until rice is cooked through and liquids have been absorbed.


Step 1

Cook taco meat ahead of time following the recipe here, and set aside. If using Spanish Rice, prepare ahead of time and set aside.

Step 2

Preheat oven to 400 degrees. Cut tortillas in half once, set aside. Warm up refried beans, set aside.

Step 3

In a casserole dish, start by layering 4 tortilla halves and top with 1/4 of the enchilada sauce. If using rice, this will be your next layer. Simply press rice to create a flat surface on top of the sauce and tortillas.

Step 4

Using the back of a spoon, spread the refried beans on top of the rice. Then top with prepared taco meat. Add another 1/4 of the enchilada sauce on top and smooth out using the back of a spoon.

Step 5

Drizzle vegan sour cream, and top with 1/3 of the shredded vegan cheddar cheese. Place 6 tortilla halves on top and spread remaining enchilada sauce on top.

Step 6

Bake for 25 minutes, then remove from oven and top with remaining shredded vegan cheddar and mozzarella cheeses. Place back in oven until the cheese is fully melted, roughly 10 minutes. Enjoy!

Easy Taco Meat (Gluten & Dairy Free)

Easy Taco Meat (Gluten & Dairy Free)

The absolute BEST Taco Meat!

This easy recipe comes together in just 15 minutes and is the perfect base for Tacos. 


SHOP MY AMAZON FOR INGREDIENTS: www.amazon.com/shop/kaylacguerra

Ingredients:

1 lb organic grass fed ground beef (85/15)

1 can organic green chilis

1/2 yellow onion, chopped

3 garlic cloves, minced

1/4 cup organic beef bone broth

1 package Siete Taco Seasoning (mild or spicy)

1 teaspoon olive oil


Step 1

Over medium-high heat, cook the onion, garlic and chilis with olive oil until fragrant and translucent (roughly 5 minutes).

Step 2

Add the ground beef to the same pan, breaking up into chunks and start browning the meat. Halfway through cooking add in the taco seasoning and bone broth. Simmer until cooked through.

Step 3

Serve with your favorite taco shell, tortilla or use for enchiladas!

Taco Bell’s “Healthified” Mexican Pizza (Gluten & Dairy Free)

Taco Bell’s “Healthified” Mexican Pizza (Gluten & Dairy Free)

Recreating fast food faves is way too fun! Introducing the delicious Mexican Pizza we all love from Taco Bell, with a bit of a healthy twist 🙂

If you loved the Crunchwrap Supreme recipe, you’re going to love this one even more. For all my Vegan friends, this recipe is just as easy with your favorite vegan ground meat substitute. Follow recipe the exact same way with your protein substitute option.

Which fast food favorite should I recreate next? Comment below!


Step 1

Start by cooking your meat, over medium heat with a drizzle of avocado oil. Add in taco seasoning according to package. Break up well with a wooden spoon.

Step 2

While that cooks, heat a skillet over medium heat and spray with avocado oil spray or coconut oil spray. Once it’s hot, add your tortilla. Cook for about a minute on each side or until they get crispy (you will need 2 tortillas per Mexican pizza).

Step 3

Spread refried black beans evenly over your crispy tortilla then top with your taco meat and cashew fiesta dip (melt this first). Add another tortilla on top, spread evenly with red enchilada sauce, sprinkle cheese over the sauce and add a couple spoonfuls of pico de gallo on top.

Step 4

Broil for about 2-3 minutes until cheese is melted and voila! (Option to top with vegan sour cream, fresh avocado or guacamole after).

Enjoy!

Super Simple Overnight Oats (Gluten & Dairy Free)

Super Simple Overnight Oats (Gluten & Dairy Free)

A super easy and healthy breakfast idea that you can make the night before and grab and go in the morning! You can use your favorite non dairy milk, switch out the fruit and play around with different toppings.

Here’s the basic ratio for the perfect overnight oats: this recipe makes two servings


SHOP MY AMAZON FOR INGREDIENTS: www.amazon.com/shop/kaylacguerra

Ingredients:

1 cup gluten free oats

1 cup non dairy milk (I used unsweetened coconut milk)

1 tablespoon chia seeds

1 tablespoon pure maple syrup or monkfruit maple

1 tablespoon nut topping (I used pistachios)

handful of your favorite fruit/berries

sprinkle of cinnamon

optional: 1 tablespoon nut butter

CLICK HERE TO GET THESE CUTE JARS!


Step 1

In a jar or Tupperware (with lid), stir all ingredients together except for the berries/fruit.

Step 2

Add fruit on top once combined.

Step 3

Place in fridge over night and enjoy in the morning!

Buffalo Chicken Meatballs (Gluten & Dairy Free)

Buffalo Chicken Meatballs (Gluten & Dairy Free)

Personally, I think these are a better party dish than everyone’s go to buffalo wings because not only are they SUPER easy to make, they also won’t make a disaster as your guests enjoy them! Oh and did I mention, they’re also healthy?


Ingredients:

1 lb ground chicken

1/2 cup almond flour or rice flour

1 egg

1/4 of a yellow onion, chopped

2 garlic cloves, chopped

1/4 cup Franks Buffalo Sauce, linked here

  • You will also need roughly 1/2 cup to toss meatballs in once they are done cooking

1/2 teaspoon onion powder

1/2 teaspoon garlic powder

Pinch Sea Salt & Pepper


Step 1

Preheat oven to 400 F, line a baking sheet with parchment paper, set aside.

Step 2

Add all ingredients into a large mixing bowl, and combine until mixture comes together (I use my hands for this part, but you can use a rubber spatula if you’re not into touching raw meat with your hands).

Step 3

Form mixture into roughly 8-10 meatballs, about 2 tablespoons in size if you were to measure.

Step 4

Bake for 12 minutes, then remove and flip meatballs on to the other side. Return to over for another 12 minutes.

Step 5

Let cool for roughly 10 minutes, then place meatballs in a baking tray or bowl and pour the 1/2 cup of buffalo you set aside on top. Gently toss to coat meatballs, and you’re done!

Cheesy Beef Quesadillas (Gluten & Dairy Free)

Cheesy Beef Quesadillas (Gluten & Dairy Free)

Looking for super easy and healthy cheesy ground beef quesadillas? You’ve come to the right place! The best part, they’re completely dairy and gluten free! Well-seasoned ground beef, lots of ooey gooey dairy free cheese and a crispy golden brown exterior make these quesadillas simply irresistible. They’re sure to become a favorite in your home.


SHOP MY AMAZON FOR INGREDIENTS: www.amazon.com/shop/kaylacguerra

Ingredients:

1 lb grass fed organic ground beef

1 package Siete Taco Seasoning

1/2 tablespoon olive oil

1 can organic green chilis

1/3 cup beef bone broth

6 gluten free tortillas, (I used Siete Burrito Size Tortillas)

7 oz shredded vegan cheddar (I used Follow Your Heart)

7 oz shredded vegan mozzarella (I used Follow Your Heart)

1 can vegan refried beans (I used Siete Refried Pinto Beans)

Salsa, guacamole and/or sour cream, for serving (optional)


Step 1

Preheat oven to 200 degree Fahrenheit (to keep quesadillas warm while cooking batches).

Step 2

Meanwhile, heat olive oil in a large non-stick frying pan over medium heat. Add ground beef, chilis, bone broth and taco seasoning. Cook, breaking the ground beef into small pieces and stirring occasionally, until the ground beef is fully cooked through. Remove beef from the pan and place into a bowl.

Step 3

In a small pot, heat up the refried beans just until warmed. Set aside.

Step 4

Distribute a handful of each of the cheeses among all tortillas (on one side of them). Top with a layer of ground beef and then spoon refried beans on top of the beef. Top beans with more cheese, and then fold over each tortilla so it’s a half-moon shape.

Step 5

To cook quesadillas, heat about 2 teaspoons of olive oil in a large non-stick frying pan over medium-low heat. Place two quesadillas in the pan. Cook for about 2 minutes on one side.

Step 6

Carefully flip quesadillas to the other side and continue to cook for another 2 minutes or until golden brown and crispy on the outside and the cheese is melted inside. Transfer cooked quesadillas to a sheet pan and place into preheated oven to keep warm. Repeat process to cook remaining quesadillas.

Step 7

Once done, cut each half-moon (quesadilla) in half and serve with salsa, guacamole and/or sour cream. Enjoy!

Stuffed Mushrooms (Gluten & Dairy Free)

Stuffed Mushrooms (Gluten & Dairy Free)

If you are in need of a crowd pleasing appetizer that is sure to impress even the toughest food critic – you came to the right place!

This a gluten free, dairy free, whole 30 approved and paleo version of a classic favorite.


Ingredients:

1 recipe cashew cream

1 lb mushrooms, destemmed

1 lb italian sausage

2 tablespoons vegan butter

1/2 yellow onion, chopped finely

mushroom stems chopped

2 cloves garlic, chopped

1 cup spinach, chopped

1 teaspoon sea salt

1/2 teaspoon onion powder

1/4 teaspoon paprika

1/2 teaspoon pepper

Cashew Cream Ingredients

1 cup raw cashews

water for soaking

1 teaspoon olive oil

1/2 teaspoon sea salt

1/2 teaspoon garlic powder

2 tablespoons nutritional yeast

1/2 cup chicken broth


Step 1

Preheat oven to 375 F. Line a baking sheet with parchment paper.

Step 2

Place cashews in a bowl and cover with hot water for 30 minutes. Remove the stems from mushrooms and set aside. Chop up garlic and onion, and sauté in vegan butter until softened. Meanwhile chop up the mushroom stems, and add them in with the garlic and onion, roughly 5-7 min.

Step 3

Drain cashews and place in food processor or blender. Add in the sauteed garlic, onion and mushroom stems. Blend together with remaining ingredients under cashew cream ingredients until smooth.

Step 4

In same pan, saute the sausage over medium heat until cooked through. Add in chopped spinach and remaining seasonings. Cook for roughly 3 minutes. Then fold cashew cream into this mixture.

Step 5

Scoop a generous amount into the mushroom caps & bake for 15-20 minutes. Enjoy!