Veggie Egg Bites (Gluten & Dairy Free)

Veggie Egg Bites (Gluten & Dairy Free)

Ingredients:

6 eggs

1/4 cup Spinach, chopped

1/2 of any color Bell Pepper, chopped

1/4 cup Dairy Free Shredded Cheddar Cheese

1 tablespoon Oat Milk

1 teaspoon Sriracha (optional)

Garlic Salt & Pepper to taste


Step 1

Preheat oven to 350 F. Spray mini muffin/cupcake pan and set aside.

Step 2

Chop veggies & shredded cheese, set aside. In a mixing bowl, whisk together eggs, oat milk and Sriracha (if you’re using). Season with garlic salt & pepper.

Step 3

Place a small amount of spinach and bell pepper in prepared pan, top with the shredded cheese. Fill with egg mixture almost to the top.

Step 4

Bake for 20 minutes and enjoy 🙂

No Bake Peanut Butter Protein Bars (Gluten & Dairy Free)

No Bake Peanut Butter Protein Bars (Gluten & Dairy Free)

I get it, buying a store-bought protein bar is convenient, quick and they are delicious. Have you ever looked at the laundry list of ingredients though? It’s amazing to me that one tiny bar can hold 20 plus ingredients, and half of them are impossible to pronounce!

I’m totally bias to making your own protein bars because it is incredibly easy, I know exactly what is going into my body, and it’s such a money saver! To make this recipe, all you need is a mixing bowl, a spoon, and a small saucepan.


Ingredients:

1 3/4 cup rolled oats

1 teaspoon cinnamon

2 tablespoons flaxseed meal

2 tablespoons chia seed

1/2 cup collagen unflavored protein powder, linked here

1/4 cup plant based cocoa nibs, linked here

pinch of sea salt

3/4 cup no sugar added peanut butter

2 tablespoons coconut oil

1/2 cup liquid monk fruit sweetener, linked here


Step 1

Line an 8×8 square pan with parchment paper & set aside.

Step 2

In a medium sized mixing bowl, stir together the rolled oats, cinnamon, flaxseed meal, chia seed, sea salt, cocoa nibs & protein powder.

Step 3

In a small sauce pan, on medium heat, melt together the coconut oil, peanut butter and monk fruit sweetener. Stirring frequently so the peanut butter doesn’t burn.

Step 4

Add the melted peanut butter mixture to the mixing bowl, and stir to combine ingredients. This should come together pretty quickly. You will know you’re done stirring once it forms a ball.

Step 5

Place the mixture into the prepared pan, and using the back of a rubber spatula (or your hands will be just fine), press mixture evenly into pan. Place in refrigerator for about 30-45 minutes, then take out, remove parchment paper, and slice into small squares or rectangles (whichever your prefer). Enjoy!

STORAGE: store in refrigerator for 7-10 days

Balsamic Glazed Chicken & Pesto Pasta (Gluten/Dairy Free)

Balsamic Glazed Chicken & Pesto Pasta (Gluten/Dairy Free)

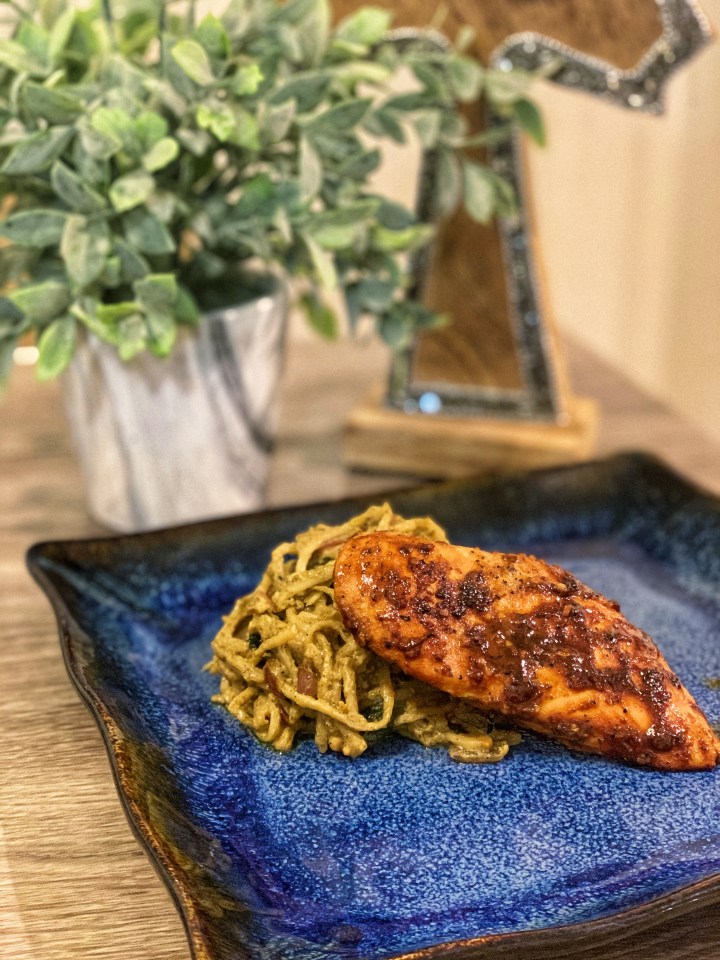
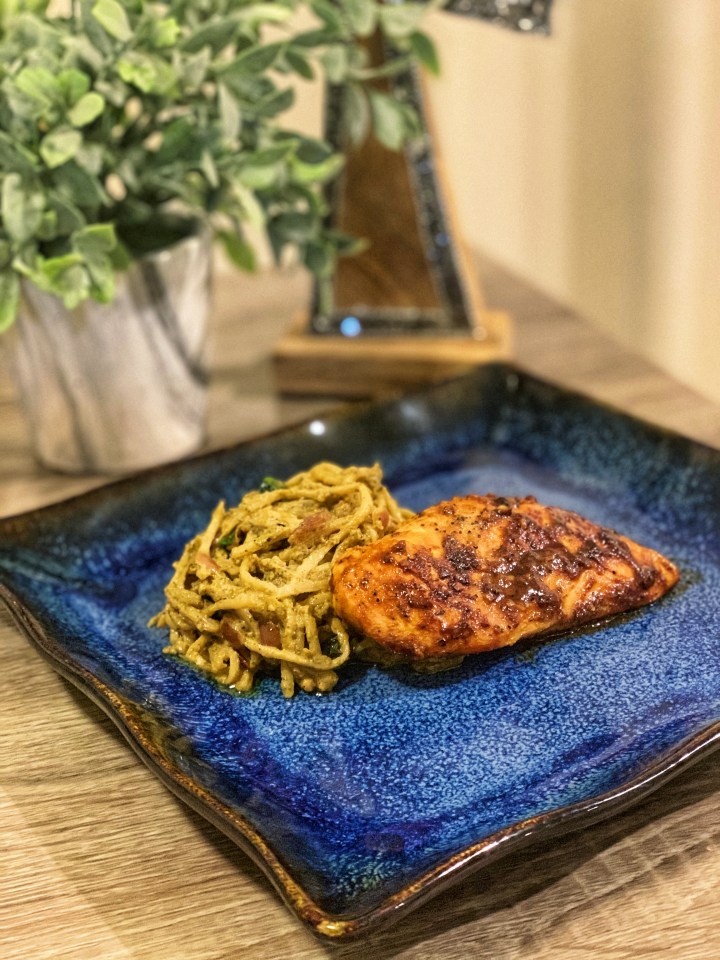
If you thought eating gluten/dairy free was boring, think again! This is one of my go to chicken recipes that packs so much flavor and uses only a few ingredients. I decided to pair it with a new take on a vegan pesto pasta dish.

I’ve been wanting to test out these noodles made from hearts of palm that I found at Whole Foods as I’m always looking for new innovative ways to recreate hearty dishes without the hearty amount of carbs. Not because carbs are “bad,” but because generally a lot of gluten free pasta noodles are made from overly processed rice or other gluten free grains that also contain other ingredients that just don’t make me feel great.

Personally, I think this was a winner of a recipe (which is why I want to share it with you) and can’t wait to recreate more pasta dishes using these noodles! Continue reading for a delicious creamy pesto pasta that you won’t feel guilty for indulging in after.


Balsamic Glazed Chicken Ingredients:

4 thinly sliced chicken breasts

3 garlic cloves, minced

1 tablespoon vegan butter, linked here

1/4 cup balsamic vinegar

1 tablespoon balsamic reduction, linked here

olive oil to coat pan

1/2 teaspoon onion powder

1/2 teaspoon oregano

1 teaspoon garlic powder

sea salt & pepper to taste

Vegan Pesto Ingredients:

2 cups fresh basil

1/2 cup pine nuts

3 garlic cloves, chopped

1/2 cup olive oil

1 tablespoon lemon juice

1 teaspoon balsamic vinegar

3 tablespoons nutritional yeast, linked here

pinch sea salt & pepper

Pesto Pasta Ingredients:

12 oz hearts of palm linguine, linked here

1/2 red onion, chopped

2 garlic cloves, minced

1/2 cup baby spinach leaves

2 tablespoons vegan butter

1/4 cup almond milk

2 tablespoons vegan cream cheese, linked here

1/2 teaspoon garlic powder

1/2 teaspoon onion powder

sea salt & pepper to taste


Step 1

Make the pesto first – place the basil, pine nuts, and garlic in a food processor fitted with the S blade. Pulse to combine, until the mixture is coarsely ground. With the motor on, drizzle in the olive oil in a thin stream. Add the sea salt, pepper, balsamic, lemon, and nutritional yeast, and pulse a few more times to combine. Taste and adjust the seasoning to taste. Set aside.

Step 2

Drain and rinse the hearts of palm linguine using warm water, set aside in strainer to let the excess water drain out. Meanwhile, on medium heat, coat a pan with olive oil to cook the chicken. Once the pan is hot, add in the vegan butter and garlic. Place chicken in pan and season with oregano, onion powder, garlic powder, sea salt & pepper – flip chicken and season with the same seasonings.

Step 3

Once the chicken begins to brown, roughly 3 minutes on each side, on medium heat pour in the balsamic vinegar. Cook for roughly 5 more minutes, until there is no pink in the center, and drizzle balsamic reduction on top. Set aside to rest off heat while you prepare the pasta.

Step 4

On medium to low heat, melt the vegan butter and add in the chopped onion and garlic. Turn heat to medium and cook until softened, about 7 minutes. Add in the prepared pesto, vegan cream cheese and almond milk. Stirring to combine and melt the cream cheese. Then add in the drained linguine, seasoning it with garlic powder, onion powder, sea salt & pepper (you can adjust seasoning as needed). Cook this combination for 5-7 minutes, until the linguine has softened up a little bit.

Step 5

Add the spinach leaves in last to avoid overcooking them. Stir to combine into the pasta, and once they have softened (this will happen very quick), you’re done! Place a bed of noodles on your plate, top with prepared chicken & enjoy 🙂

Fluffy Gluten & Dairy Free Pancakes

Fluffy Gluten & Dairy Free Pancakes

Everyone loves pancakes, and I especially love a good gluten-free pancake recipe! I’ve been making this recipe for years as it is so simple and takes no time to whip up. The pancakes come out nice and fluffy, and full of flavor. Let’s get started!

Ingredients:

1 1/3 cup almond flour

1 teaspoon baking powder

1/4 teaspoon baking soda

Pinch of sea salt

1 teaspoon vanilla

2 eggs

3/4 cup almond milk

Avocado Oil for skillet

Dairy free butter for topping

Monk fruit sweetened maple syrup or 100% pure maple for topping


Step 1

In a medium bowl, whisk together the dry ingredients. Separately whisk together the wet ingredients. Add the dry ingredients to the wet ingredients and stir until completely combined.

NOTE: Batter will be on the thicker side, this is what you want for fluffy pancakes 🙂

Step 2

Heat your skillet or griddle on medium heat. Using either avocado oil or dairy free butter, coat the pan. Once the pan is hot, scoop the batter (roughly 1/4 cup at a time). Cook on the first side until little bubbles start to appear on top of the pancakes, then flip and cook until a little brown. Keep in mind, they cook quick. Repeat these steps with the remaining batter.

Step 3

Serve with dairy free butter and your choice of maple syrup. I also sprinkle a little cinnamon on mine. Yummmm!

Easy Peanut Butter Cookies

Easy Peanut Butter Cookies

Peanut Butter is probably one of my favorite things, and since we are still somewhere in the middle of the COVID-19 quarantine, it helps to use simple ingredients you probably have on hand already.

I made this recipe simple enough for anyone to throw together – all you will need is a bowl, electric mixer (or whisk) and a baking sheet!


Ingredients:

1 Egg

1/4 cup Vegan Butter or Coconut Oil, melted

3/4 cup Creamy Peanut Butter

3/4 cup Coconut Sugar

1 tsp Vanilla

1 1/2 cup Almond Flour

1 teaspoon Baking Soda

1/4 teaspoon Sea Salt

1/4 cup Coconut Sugar, set aside to roll dough in


Step 1

Combine all ingredients in bowl and mix on medium speed. Place in refrigerator for 20 minutes.

Step 2

Preheat oven to 350 degrees and line a baking sheet with parchment paper.

Step 3

Using a cookie scooper, scoop dough and roll into the coconut sugar you set aside. Place on prepared baking sheet, and use a fork to create a criss cross design on top (optional). You can also just use your palm and press the dough down a little.

Step 4

Bake for 10 minutes, and that’s it! Enjoy 🙂

Roasted Sweet Potato Wedges

Roasted Sweet Potato Wedges

If you aren’t the biggest fan of the sweetness of a sweet potato, think again! This simple seasoning blend adds the perfect balance to the crispy, caramelized exterior, making these the perfect side to pair with just about any dish.

I like to make my sweet potatoes into wedges that way I can pick them up and dip them into my favorite ketchup from Primal Kitchen.


Ingredients:

2 large sweet potatoes

1 tablespoon olive oil

1 teaspoon sea salt

1/2 teaspoon black pepper

1/2 teaspoon garlic powder

1/4 teaspoon cumin

1/4 teaspoon paprika

1/4 teaspoon chili powder

1/8 teaspoon cinnamon


Step 1

Preheat your oven to 425, and line a baking sheet with parchment paper. Wash and dry your sweet potatoes (THIS PART IS VERY IMPORTANT, MAKE SURE THEY ARE VERY DRY OR YOU WILL HAVE MUSHY POTATOES).

Step 2

Slice the sweet potatoes into 1/2 inch thick wedges. Put in a large mixing bowl & toss the potatoe wedges in the olive oil. Add all of your seasoning and toss to coat all wedges. Spread onto prepared baking sheet, making sure none of the potatoes overlap each other.

Step 3

Place in preheated oven for 10-12 minutes, then take them out and flip them, place back in oven for another 10-12 minutes, repeat one more time or until desired crispiness (total time in oven is roughly 35 minutes).

Enjoy!


Recipe Note: If you want your sweet potatoes even more crispy, after total cook time, put your oven on its High Broil setting for 3 minutes on each side. Make sure to pay close attention so they don’t burn.

Not Your Average Chocolate Chip Cookie

Not Your Average Chocolate Chip Cookie

Let’s be honest, is there really anything better than the smell of freshly baked chocolate chip cookies? I think not!

Not only are these as delicious as they make your home smell, they are also Gluten & Dairy Free. And did I mention, ridiculously easy to make as well?


Ingredients:

1 egg

1/4 cup tahini

1/4 cup liquid monk fruit sweetener

3/4 cup almond flour

1/3 cup creamy cashew butter

1/3 cup coconut oil, melted

1 teaspoon baking soda

1/4 teaspoon salt

1/4 cup dairy free chocolate chips


Step 1

With an electric mixer, on medium speed, mix together all ingredients EXCEPT the chocolate chips. Once the dough comes together, add in chocolate chips and slowly mix in (the dough should be a little sticky).

Step 2

Refrigerate for roughly 20 minutes. Meanwhile, preheat your oven to 375 degrees & line your cookie sheet with parchment paper.

Step 3

Using a 3/4 oz cookie scoop, scoop onto parchment lined baking sheet. Bake for 10 – 12 minutes, or until cookies are your desired texture.


Makes around 12 cookies

Nut Butter Protein Bites

Nut Butter Protein Bites

Do you find yourself reaching for an overly processed protein bar when you’re on the go or when you just don’t have the time to make breakfast in the morning? Think again!

This is the perfect on the go breakfast or snack that will actually keep you feeling satisfied! Best of all, it’s only 6 ingredients & so easy to make.

Gluten and Dairy Free friendly, of course.


Ingredients:

2 cups nut butter of your choice (I use almond or peanut butter)

1/4 cup coconut flour

1/4 cup collagen protein powder (I use the Vital Proteins unflavored)

1/2 cup liquid monk fruit sweetener

1/4 cup cocoa nibs

1/4 teaspoon cinnamon


Step 1:

With an electric mixer, mix on medium speed all ingredients EXCEPT the cocoa nibs.

Step 2:

Once it starts to come together, on a low speed, add in the cocoa nibs.

Step 3:

Scoop out using a 3/4 oz cookie scoop, and you’re done!


Makes roughly 12 – 14 bites. Store in an airtight container in the refrigerator for up to 2 weeks.

Turmeric Ginger Chicken Soup

Turmeric Ginger Chicken Soup

Your new go to winter soup in under an hour!

Packed with protein and full of anti – inflammatory benefits.

Gluten and Dairy Free friendly, of course.


Ingredients:

1 tablespoon coconut oil

4 garlic cloves, minced

3 teaspoons fresh ginger, grated

2 jalapeños, seeded & diced

1 lb chicken breast, cut into bite size pieces (vegetarian option: substitute tofu)

1/2 white onion, diced

1 red bell pepper, sliced thinly

1 large sweet potato, peeled & diced in small cubes

2 teaspoons ground turmeric

4 cups chicken bone broth (vegetarian option: substitute vegetable broth/stock)

1 (15 oz) can chickpeas, drained

1 cup light coconut milk, unsweetened

2 tablespoons creamy peanut butter, unsweetened/unsalted

Salt & Pepper to taste


Step 1

Heat coconut oil – once hot, add garlic, ginger, jalapeños & chicken breast. Cook for roughly 5 minutes, browning chicken. Then stir in onion, red pepper & sweet potato.

Step 2

Cook until sweet potato cubes are slightly softened and chicken is no longer pink. Add in turmeric and stir to coat all ingredients.

Step 3

Add in remaining ingredients, stir to combine. Then bring soup to a boil, cover and simmer for 25-30 minutes – or until sweet potatoes are tender.

Step 4

Taste and adjust seasoning as necessary. Then ladle into bowls & serve!


Serves 4-6 bowls