One Pan Chicken Fajitas w/ Cilantro Lime Crema (Keto, Gluten & Dairy Free)

One Pan Chicken Fajitas w/ Cilantro Lime Crema (Keto, Gluten & Dairy Free)

One pan = key to quick and delicious weeknight dinners! If you’re like me and want to put minimal effort but still make something that is healthy, these are a MUST TRY. They are also perfect for meal prepping too!

The cilantro lime crema isn’t a must if you’re on a time crunch, but I can guarantee you won’t regret the few extra minutes spent to throw it together. Happy Taco Tuesday friends!


Ingredients:

For the fajitas

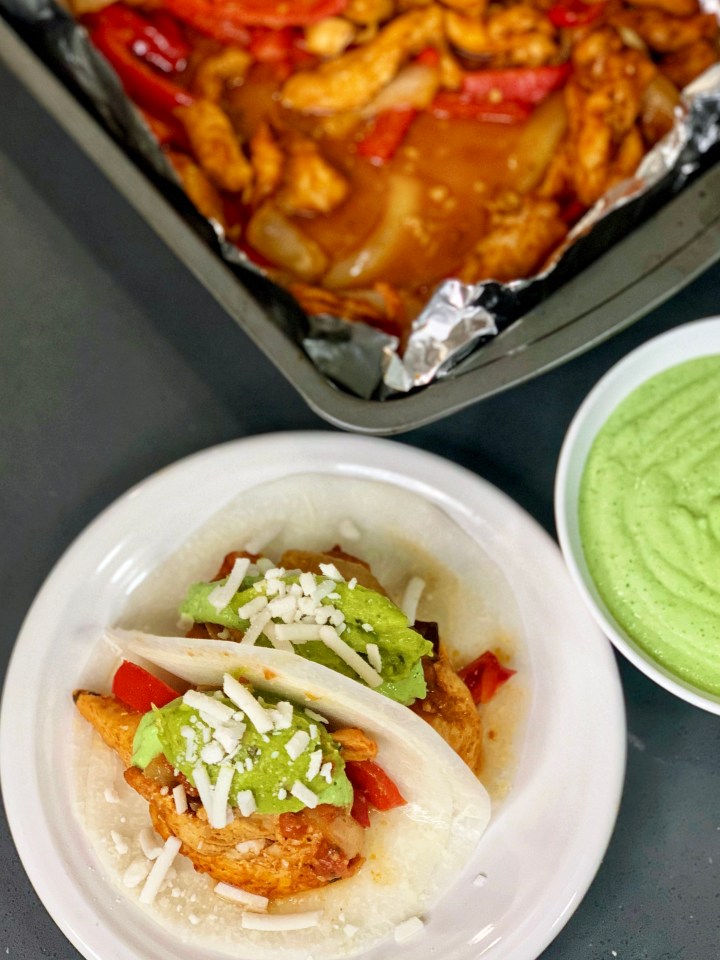
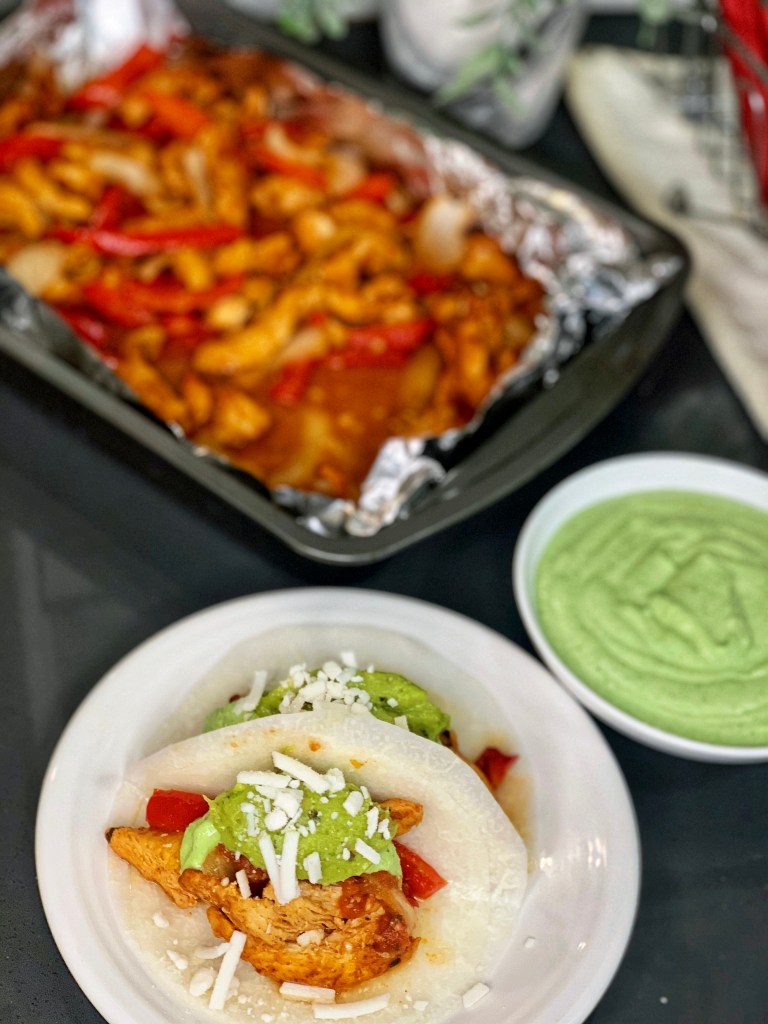
1.5 lbs chicken breast, sliced

2 bell peppers, sliced

1/2 yellow onion, sliced

1 lime squeeze

1 packet Siete Taco Seasoning, linked here

1/4 cup chicken bone broth

2 tablespoons olive oil

Jicama Wraps, for a low carb option (or your choice of tortilla)

optional toppings: salsa, guacamole or avocado, and vegan shredded cheese

For the Cilantro Lime Crema

1 cup cashews, soaked & drained

1/2 cup water

1/4 cup lime juice

1/2 cup fresh cilantro

2 garlic cloves

1/2 teaspoon salt

1/4 teaspoon onion powder

2 tablespoons plain coconut milk yogurt


Step 1

Preheat oven to 400F degrees, and line a sheet pan with foil or parchment paper. Place cashews in a bowl covered in warm water. Set both aside.

Step 2

Spread the sliced chicken and veggies evenly in prepared pan. Coat in olive oil, bone broth, and lime squeeze, and stir. Add the taco seasoning, stirring to combine. Place in oven for 20-25 minutes until chicken is cooked through.

Step 3

While the chicken is cooking, prepare the cilantro lime crema. Drain the cashews, add to a blender or food processor, followed by remaining ingredients. Blend all until smooth.

Step 4

Prepare your tacos with whatever toppings you’d like and enjoy!

Maca Energy Bars (Vegan, Gluten & Dairy Free)

Maca Energy Bars (Vegan, Gluten & Dairy Free)

The healthy snack for happy hormones | Some of you may know this already, or maybe you don’t, but I’ve struggled with correcting a hormone imbalance for the past 4 years. It’s been my goal to find ways to balance my hormones naturally, so I wouldn’t have to resort to medication to fix the issue. In doing so, I’ve come across many different supplements and foods that naturally support your hormones (I’ll be doing a post all about this v soon) which essentially led me to discover this highly nutritious plant, called Maca.

If you aren’t familiar with Maca, it’s a plant that is native to Peru, with a long history of holistic, medicinal use due to it’s nutritious health profile. It is a great source of B vitamins, Iron, Vitamin C, and Fiber, and is a natural energy booster. There are tons of other amazing benefits you can research, but if you are interested in trying these super simple, delicious, melt in your mouth energy/protein bars, keep scrolling 🙂


Ingredients:

1 cup chocolate protein powder, linked here

2 tablespoons oat milk

6 tablespoons monk fruit maple syrup, linked here

5 tablespoons chocolate sunflower butter, linked here

1 tablespoon chia seed

1/3 cup coconut flour

2 tablespoons Maca powder, linked here

1/4 teaspoon baking soda

3 flax eggs (3 tablespoons flaxseed meal + 9 tablespoons water)

Pinch, sea salt

Dash, cinnamon

2 tablespoons cashew butter (to drizzle on top)

Handful, crushed raw cashews


Step 1

Preheat oven to 350F, and line an 8×8 square baking dish with parchment paper. Set aside

Step 2

Combine water and flaxseed meal for the flax egg, set aside to set up, roughly 5 minutes.

Step 3

Place the oat milk, monk fruit maple syrup and chocolate sunflower butter in a microwave safe bowl and melt together, about 1 minute.

Step 4

In medium mixing bowl, using electric mixer, combine the melted combination from above, all of the dry ingredients, then add the flax egg last. Press down into prepared pan, bake for 10-12 minutes.

Step 5

As soon as the bars come out, drizzle the cashew butter on top, using the back of a spoon to gently spread to cover. Sprinkler crushed cashews on top, and enjoy!

Teriyaki Chicken Meatballs

Teriyaki Chicken Meatballs

One of my favorite things to meal prep for myself for the week are any kind of meatball – not only do they come together in one bowl (yay for less mess!) but they also can be easily kept in your freezer to have on hand for those days that just seem to fly by.

The flavor on these are just…WOW. I paired mine with cauliflower rice, but you can also pair it with some sautéed veggies in the left over teriyaki sauce, or serve with both!


Ingredients

to make the meatballs:

1 lb ground chicken

1 egg

1/2 cup almond flour or gluten free bread crumbs

3 garlic cloves, minced

1/2 tablespoon fresh ground ginger

2 tablespoons green onion, chopped finely

1 tablespoon gluten free soy sauce

2 teaspoons sriracha (optional)

1 teaspoon sea salt

1/2 teaspoon black pepper

to make the sauce:

1/3 cup gluten free soy sauce

2/3 cup water

3 tablespoons monk fruit maple syrup

1 teaspoon fresh ginger, minced

1 garlic clove, minced

1 tablespoon rice vinegar

1/4 teaspoon sesame oil

pinch sea salt

1 1/2 tablespoons arrowroot + 1 1/2 tablespoons water

to serve:

your choice of rice or veggies, sautéed in extra sauce


Step 1

Preheat oven to 400F and line pan with parchment paper.

Step 2

In medium sized bowl, combine all of the ingredients for the meatballs (I like to use my hands, but you can use a rubber spoon to combine as well).

Step 3

Form the mixture into balls, should make roughly 12. Place on prepared pan and bake for 20 – 25 minutes, until cooked through.

Step 4

While the meatballs are in the oven, make the sauce. In a small saucepan, over medium heat, combine all of the sauce ingredients except the arrowroot & water mixture. Whisk to combine.

Step 5

In a small bowl, combine the arrowroot & water. Pour this into the teriyaki sauce and whisk for 1-2 minutes, until the sauce thickens. Remove from heat and pour over meatballs. Enjoy!

Teriyaki Chicken Stir Fry with Egg Fried Noodles (Gluten, Dairy & Refined Sugar Free)

Teriyaki Chicken Stir Fry with Egg Fried Noodles (Gluten, Dairy & Refined Sugar Free)

I’d like to call this a new and improved, modern day teriyaki chicken stir fry – but my title was getting long enough as it is. So let me just tell you, this dish will become a staple weeknight dinner, it’s THAT good. And it’s pretty simple!

Just picture everything you love about a traditional teriyaki stir fry, minus the discomfort you feel after eating it. You can thank me later 🙂


Ingredients:

For the Stir-Fry

1 tablespoon vegan butter, linked here

3 garlic cloves, minced

1 tablespoon sesame oil

1 tablespoon rice vinegar

3 chicken breasts, chopped into cube size pieces

1 cup broccoli, chopped

1 bell pepper, sliced

1/2 yellow onion, sliced

1/4 teaspoon turmeric

3/4 cup gluten free soy sauce, linked here

1/4 cup raw honey, linked here

salt & pepper to taste

For the Noodles

1/2 tablespoon sesame oil

1/2 tablespoon rice vinegar

1 tablespoon sriracha (optional)

2 eggs

1 – 12 oz package of Kelp Noodles (rinsed), linked here


Step 1

In a large skillet, sauté the garlic and butter until fragrant. Then add in your chopped chicken breasts. Season with the turmeric, salt and pepper. Cook on medium heat until halfway done.

Step 2

Add in the sesame oil, rice vinegar, soy sauce and honey. Stirring occasionally until chicken is cooked through. Remove chicken once it’s done and set aside.

Step 3

In the remaining sauce, on medium heat, add in your onion, bell pepper and broccoli. Put a lid on to let the veggies steam until softened, roughly 10 minutes.

Step 4

Meanwhile, in a separate pan, heat the first 3 ingredients under for the noodles, then add in the rinsed kelp noodles. Coat in the mixture and stir for about 5 minutes to heat the noodles before adding the eggs. Push the noodles to one side of the pan, and crack the eggs directly into the same pan, stirring to scramble.

Step 5

Once the noodles & egg mixture come together, turn heat higher to get the sizzling sound and making sure each noodle is coated with the egg. Put your desired serving of noodles onto your plate.

Step 6

Add the chicken back into the sauce/veggie mixture, turn on medium high heat to heat it all up. Then top your noodles with chicken, veggies and sauce. Enjoy!

Sweet & Sour Shrimp (Gluten/Dairy Free)

Sweet & Sour Shrimp (Gluten/Dairy Free)

Let’s be honest, we all love Chinese take out from time to time. But if you have food allergies/dietary restrictions like me, it could be extremely difficult to find options suitable for your diet.

Long story short, I was craving some sweet and sour something, and didn’t want to feel like crap afterwards – so I made my own. Safe to say, this hit the spot. I used honey to sweeten the sauce, so there is no refined sugars or artificial ingredients like the restaurant kind. It’s perfectly sweet with just a little spice! Yummmy…


Ingredients:

2 lbs wild shrimp

3/4 cup gluten free soy sauce

5 tablespoons rice vinegar

1/2 cup raw honey

2 tablespoons Sriracha

3 teaspoons sesame oil

4 garlic cloves, minced

1 teaspoon red chili flakes

2 tablespoons tapioca flour or arrowroot starch + 1/2 cup hot water (this thickens the sauce)

serve with your choice of rice & veggies


Step 1

Wash, devein and remove tails from your shrimp. Set aside in refrigerator.

Step 2

Heat a medium saucepan over medium heat, and drizzle sesame oil to coat the pan, adding in your minced garlic. Once garlic is a little browned, whisk together all of the sauce ingredients, EXCEPT the tapioca/arrowroot starch & water.

Step 3

Bring sauce to a boil, then slowly whisk in tapioca/arrowroot starch & warm water mixture, turn onto low heat and simmer for about 5-10 minutes until sauce thickens.

Step 4

In a medium skillet, heat a little more sesame oil to coat pan, and on medium heat add in the shrimp. Sautee for a few minutes until shrimp turns pink, seasoning with salt to taste. Pour sauce mixture over the shrimp.

Step 5

Using the same skillet, I sautéed my veggies & added them in a bowl with cauliflower rice. You can eat the shrimp by itself or also make some rice and veggies to accompany it! Enjoy 🙂


Creamy Pesto Pasta with Sausage (Gluten & Dairy Free)

Creamy Pesto Pasta with Sausage (Gluten & Dairy Free)

Keeping the St. Patty’s day theme going throughout the weekend with another green colored, crowd pleasing dish!

VEGAN FRIENDS: Option to leave out the sausage or add in your favorite plant based protein 🙂


Ingredients:

For the Pasta

1 shallot, chopped finally

4 garlic cloves, chopped

1 package gluten free pasta of your choice

1 lb Italian sausage

2 tablespoons dairy free butter, linked here

1 cup dairy free parmesan, linked here

1 teaspoon olive oil

salt & pepper to taste

1 recipe of creamy pesto sauce (directions below)

For the Creamy Pesto Sauce

2 tablespoons nutritional yeast

1 teaspoon olive oil

1/2 cup raw cashews

1/2 cup vegetable broth

1 teaspoon garlic powder

1 teaspoon sea salt

1 cup vegan pesto sauce

Recipe Note: I used Trader Joes Vegan Kale Pesto, linked here. But you can use any store bought vegan pesto. I would just recommend finding one that is not super oily!


Step 1

In a small bowl, place the cashews with warm water for 30 minutes, set aside. Meanwhile bring a large pot of water to a boil.

Step 2

Once water is boiling, add in the pasta and cook until al dente (about 8-10 min). Drain the pasta, keeping a little bit of the pasta water in the pan, drizzle with olive oil and set cooked noodles aside.

Step 3

Sautee the shallot and garlic in vegan butter until softened. Add in the sausage and cook through, stirring frequently.

Step 4

While the sausage is cooking, using a food processor or blender, add in the drained cashews & remaining ingredients for the creamy pesto sauce. Blend until smooth.

Step 5

Once the sausage is cooked, add noodles to pan, and pour the sauce on top. Stir to coat all noodles. Sprinkle with parmesan and enjoy!

The Best Spinach Artichoke Dip (Gluten & Dairy Free)

The Best Spinach Artichoke Dip (Gluten & Dairy Free)

Since St. Patricks Day is right around the corner, I thought why not share this recipe! It is a crowd pleaser and great for a last minute St Patricks Day themed idea (because it’s green, not because it’s Irish…lol)!

Traditional spinach artichoke dip is full of dairy, which is probably why you feel so uncomfortable after eating it. Not only is this one gut health friendly, dairy free and gluten free, but it is also a one pot wonder. Less than 30 minutes to make

I linked all of the dairy free products in the ingredient list that are my favorites to cook with, in case you needed some options 🙂


Ingredients:

4 oz dairy free sour cream, linked here

4 oz dairy free unsweetened yogurt

16 oz dairy free cream cheese, linked here

1 cup dairy free parmesan, linked here

1/2 cup dairy free shredded mozzarella, linked here

1 tablespoon nutritional yeast, linked here

10 oz frozen spinach, thawed/drained

1 cup fresh spinach, chopped

14 oz artichoke hearts, drained/chopped

3 garlic cloves, chopped

4 oz can diced green chilis

2 tablespoons dairy free butter, linked here

salt & pepper to taste


Step 1

In a large sauce pan, combine all ingredients. Season with salt & pepper (I used a little garlic salt as well).

Step 2

Once all the cheese is melted and mixture is bubbling, turn on low heat for 10-15 minutes, stirring frequently.

Step 3

Serve with your choice of gluten free bed or tortilla chips (the grain free Siete chips are my fave!)


DIY Homemade Dog Food – Chicken Pasta

DIY Homemade Dog Food – Chicken Pasta

Kiss kibble goodbye with this super easy recipe for your furry friends!

If we as human beings try to eliminate the amount of processed food we intake, why is it still considered “okay” to give our dogs the overly processed, hormone filled food? It’s so simple to prep for them the same way we would ourselves, so keep reading on if interested!

This recipe is packed with healthy fats, a sufficient amount of protein and a nutritious amount of carbs to keep their spirits high.


Ingredients:

3 Chicken Breasts

1/2 box Banza Chickpea Pasta, linked here

1 teaspoon Sea Salt

1 Bone Broth packet, linked here

1 tablespoon vegan butter

Splash of water


Step 1

Bring a pot of water to a rolling boil, and add in pasta. Cook until it is al dente, roughly 8-10 min, and then strain. Set aside.

Step 2

Meanwhile, slice chicken breasts into small cubes and add to a pan with vegan butter over medium heat. Season with sea salt and cook until there is no more pink left.

Step 3

Add a splash of water and sprinkle the bone broth packet over the chicken. Add in the cooked pasta, and stir to combine. Thats all 🙂


Storage: 5-7 days in the fridge, although my little guy goes through it by 5 days! He is 13 lbs for reference.

Cinnamon Vanilla Protein Bites

Cinnamon Vanilla Protein Bites

When it comes to snacking, it’s important we are reaching for something that will actually satisfy us. These protein bites are a weekly staple that I keep in my fridge to satisfy any sweet tooth craving, or if I just need to grab something on the go. They are packed with protein and healthy fats to keep you full longer – and best of all, they take no time to make!


Ingredients:

2 scoops vanilla plant based protein, linked here

2 tablespoons almond meal (or almond flour)

1 tablespoon chia seed

1 tablespoon cocoa nibs

Pinch sea salt

Sprinkle cinnamon

2 tablespoons monk fruit maple syrup, linked here

1/2 cup almond butter


Step 1

In a medium bowl, combine all ingredients.

Step 2

Roll into balls and refrigerate for 10-15 minutes. That’s it!

…told you they take no time to make 😉 enjoy!

Stuffed Mushrooms (Gluten & Dairy Free)

Stuffed Mushrooms (Gluten & Dairy Free)

If you are in need of a crowd pleasing appetizer that is sure to impress even the toughest food critic – you came to the right place!

This a gluten free, dairy free, whole 30 approved and paleo version of a classic favorite.


Ingredients:

1 recipe cashew cream

1 lb mushrooms, destemmed

1 lb italian sausage

2 tablespoons vegan butter

1/2 yellow onion, chopped finely

mushroom stems chopped

2 cloves garlic, chopped

1 cup spinach, chopped

1 teaspoon sea salt

1/2 teaspoon onion powder

1/4 teaspoon paprika

1/2 teaspoon pepper

Cashew Cream Ingredients

1 cup raw cashews

water for soaking

1 teaspoon olive oil

1/2 teaspoon sea salt

1/2 teaspoon garlic powder

2 tablespoons nutritional yeast

1/4 cup water

1/4 cup chicken broth


Step 1

Preheat oven to 375 F. Line a baking sheet with parchment paper.

Step 2

Place cashews in a bowl and cover with hot water for 30 minutes. Remove the stems from mushrooms and set aside. Meanwhile, sauté garlic, onion, and mushroom stems in vegan butter until softened. Add in the sausage and cook on medium heat until sausage is cooked through. Add spinach last and remove from heat.

Step 3

Drain cashews and place in food processor or blender. Blend together with remaining ingredients until smooth. Fold into the sausage mixture.

Step 4

Scoop a generous amount into the mushroom caps & bake for 15-20 minutes. Enjoy!